Whether you’re an avid angler or just starting out with fishing, learning how to tie essential knots is a crucial skill. Among the various knots used in fishing, the Fisherman’s Knot stands out for its reliability and strength. This knot is versatile and commonly used to connect two lines of similar or different diameters. In this comprehensive guide, we will walk you through the process of tying a Fisherman’s Knot, complete with step-by-step instructions and clear accompanying pictures. So grab your fishing line and let’s get started!
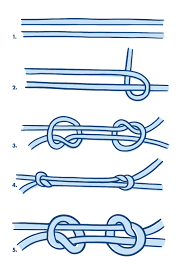
Step 1: Prepare the Lines Begin by laying the two lines you wish to connect parallel to each other, ensuring they overlap by several inches. It’s essential to have enough overlapping line to work with throughout the knot-tying process.
Step 2: Create the Initial Overhand Knot Take one end of the left line and form a loop by crossing it over the right line. Then, bring the end of the left line underneath the right line and pass it through the loop you just created. Pull both ends of the lines to tighten the loop into a simple overhand knot. Ensure the knot is close to the overlap of the two lines.
Step 3: Form the Second Overhand Knot Similar to Step 2, create another loop by crossing the end of the right line over the left line. Pass the end of the right line underneath the left line and insert it through the loop. Just like before, tighten the loop to form another overhand knot.
Step 4: Cross the Loops Cross the loops you created in Steps 2 and 3 by inserting the end of the left line through the loop formed in Step 3, and the end of the right line through the loop from Step 2. Make sure the lines cross in an “X” shape, with the loops facing in opposite directions.
Step 5: Secure the Knot Hold onto both ends of the lines and gradually pull them in opposite directions to tighten the knot. Apply steady tension until the knot is snug and secure. It’s essential to moisten the lines with saliva or water before tightening the knot to minimize friction and ensure a tight grip.
Step 6: Trim Excess Line After tightening the knot, carefully trim the excess line ends using a sharp pair of scissors or a knife. Leave a small tag of line for added security and to prevent the knot from slipping.
Step 7: Test the Knot Once you’ve tied the Fisherman’s Knot, give it a firm tug to ensure it holds its ground. Testing the knot before casting your line into the water will give you peace of mind and confidence in its reliability.
The Fisherman’s Knot is a fundamental knot every angler should know. With its simplicity and strength, it serves as a dependable connection between fishing lines. By following our step-by-step guide and referring to the accompanying pictures, you can quickly master the art of tying a Fisherman’s Knot. Remember to practice tying this knot until you can tie it effortlessly, as proficiency comes with repetition. Now, armed with this essential knot-tying skill, you’re ready to embark on your next fishing adventure with confidence!
Comments are closed